Pages

Showing posts with label garment. Show all posts

Sunday, March 25, 2012

Scallops, Tangerine Tango, Lace!

I hit them all! Check it out...


Multiple pieces went into this shirt, but I love the end results so much!

First, I love Nanette Lepore's lace over orange theme she has going on.

http://www.nanettelepore.com/new-arrivals/pep-rally-dress.html
The above image is her Pep Rally Dress. I really like how the lace tones down the orange.

Second, I had a Groupon for Mood Fabrics burning a hole in my e-mail that I decided to spend on the lace I really liked (way too expensive otherwise) as well as some sateen for some Sallie Oh inspired Clovers.

Third, when I got the lace I knew I had to make use of the scalloped edges.

So, I went to a pattern I really like with simple lines, Simplicity 2599. I skipped the embellishments, but I really like the fit of the pattern over all.


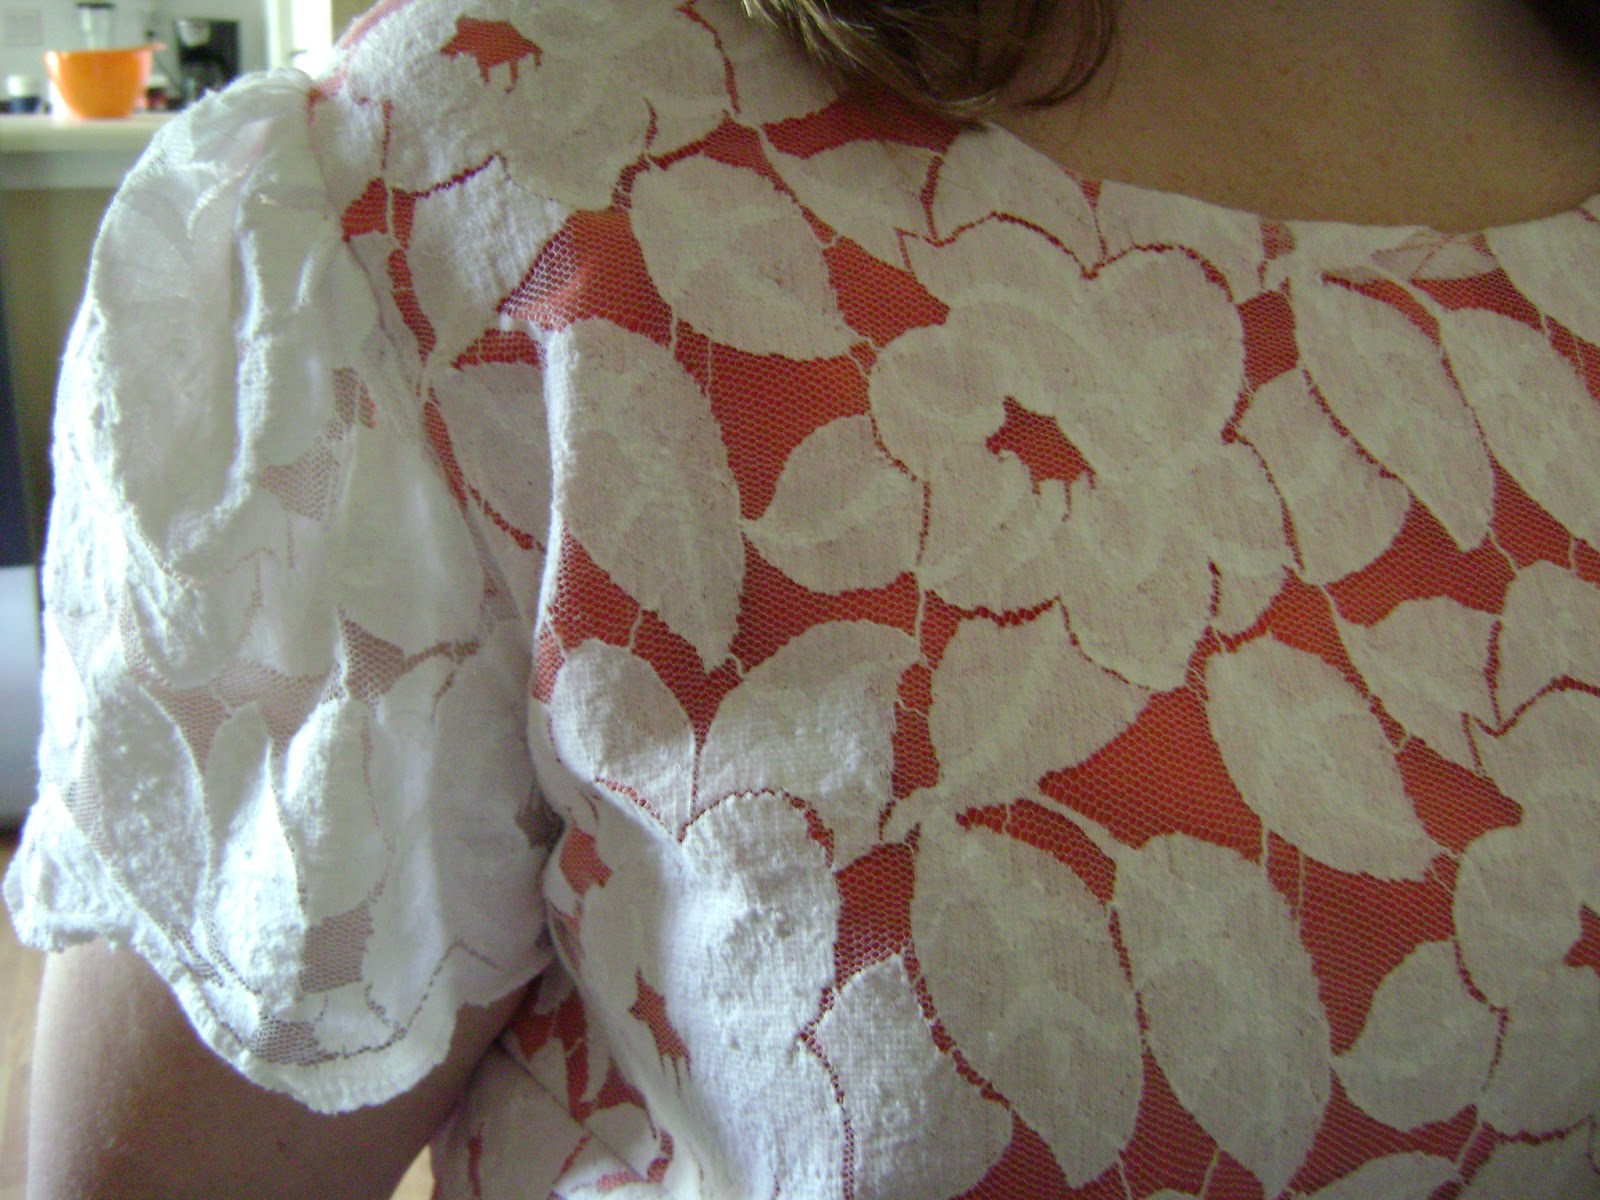
I lined the shirt with a bright orange Voile, but left the sleeves as just lace.

I also hemmed the lining a couple inches shorter than the lace to help showcase the scalloped edges.

I did the same on the front and the back.

Now if you are interested I took some construction photos. There may be a better way to make this, but this is what I came up with.

I cut out the front and back pattern pieces on my orange fabric first. I skipped the center back seam and just cut the back on the fold. It slips over my head just fine.

Then, under the judgy watchful eye of my assistant. I cut my back piece out of the fabric lining it up with the scallops showing out the bottom. I then cut the front piece out of my lace off the other side of my fabric to use the scallop edge. I lined up the front and back pieces using the waist notches to be sure the hems would line up on the shirt. Be sure to pay attention that you are using the right side of the lace on all of the pieces.

For the sleeves I just matched the center dot at the top with a center of a scallop. I repeated that on both sleeves.

I hemmed the Voile being sure to make sure it was the same hem measurement on both the front and back pieces. I  then sewed the voile and lace right sides together at the neck line only.
I under stitched the seam allowance to the lining and trimmed the excess.
I then flipped the piece right sides out.

Here is how the neckline looks on. I think it is fairly clean. Lining this way also eliminated the neck facings.

I then basted all the way around across the shoulder lines, down the arm hole and to the bottom and treated both the lace and voile as one piece of fabric and constructed it from here starting with shoulder seams, side seams then sleeves. Idid not baste the two fabrics across the bottom. It is just loose. All the hemming was done!

Be sure when sewing the shoulder seams that those inside seams line up well, otherwise they will be crooked looking.

I used this method because I did not want the lace darts to be visible. This was the dart pieces were encapsulated within the voile.

The inside is decent looking. I zig zagged the edges because I feel like I have more control with it when sewing layers. I was afraid if I serged the edges I would cut something I didn't want to. Isn't that orange, um, orange? I really like the effect the lace has on it.
I love it! And overall it only took about three hours. I can't wait to wear it some more. I think this lace overlay would make a cute simple dress too. 

Thursday, March 15, 2012

Polka dot shirt

This is my second try at Simplicity 2601. The first one still isn't finished. The instructions were weird to follow for me, but ultimately brilliant. I confess before anyone sees it, I need to move that top button over some. I just needed to get the picture while I could. It will be improved upon.

Cute right? I had to wash it after I made it, and the fabric got a little twisty. I ironed as fast as I could. It had tire tracks on it from my scooter...maybe that had something to do with the twisty fabric. Like I said, that top button needs to be shifted over a bit for better coverage.


I love the way the back looks. I find the peplum style to be flattering on me.


I added a gather on the center back bodice as it was slightly wider than the midriff pieces. Looking back I probably should have just cut the midriff pieces out again, but I do like how it turned out. I remember the midriff pieces not matching last time I made this shirt either now.


Here is the cool and slightly confusing thing about this shirt. It takes single fold bias tape and encloses the front, neck and sleeve seams. Very interesting construction and kind of genius! By the way, white would have been better for a bias tape color, but with the foot situation I have to use what I've got. It's actually kind of fun!


Here is the inside back. The bias tape around the neck is one continuous piece with the pieces along center front. It is very cool. I think I will make another one of these. It will go so much quicker now I'm sure. Even better, I have my March shirt a month done! Maybe I'll even go back and finish that first one now that I get it.

Wednesday, March 14, 2012

Fun with Google keywords

You guys would tell me if this is what I am known for, right? We're friends...right?


Because five, yes, FIVE people have Googled that top search and come up with my blog as a result!

By the way, I took that white with orange polka dot material and have been logging away at Simplicity 2601 (since Monday) and may just have something to show you tomorrow. :-) That's right. Stacie does actually sew!


It is major cute!

Wednesday, March 7, 2012

A sew along announcement and fabric binge confessions

I have exciting news! I am a new contributor to the Humble Sewing Center Blog and will be hosting a sew along using Butterick 4461, my favorite A-Line skirt with zipper. Check it out!

Now, the confessions begin.

I couldn't walk. Mr. Thinks He Can lost my debit card. Life was really hard. Warning: The following may be hard for people with will power to see. The following is based on a true story and is what happens when I am left alone with the internet and nothing else for days on end.

One of my fabrics for the skirt sew along.


A chiffon for another go at Taffy.


A cheetah print rayon. I know. What the heck? I actually really dig it. It is such a small print. I may make a simple tank dress out of it. That's my good foot to help you get an idea of scale. LOL, still can't walk.


This is one yard of a weird knit that is kind of thick. It is kind of fuzzy on one side and kind of slick on the other side. I'm sure it is for something beside a skirt, but too bad.


This is another knit that will be a wrap dress. I love it!


This is a navy charmeuse I am thinking of making a Ruby slip with. I have never worked with charmeuse, but it is really lovely.


Tangerine Tango polka dot rayon! That's my assistant's foot up there for scale. I see a nice button down out of this.

This is a navy linen blend I am hoping to make the new Cynthia Rowley shirt I am drooling over out of.

Wednesday, February 29, 2012

Red dress contest entry

Whew. Sewing with one leg is a challenge! It's not the actual sitting and sewing though. It's the pinning and ironing and finding where the seam ripper went that killed me. And yes, I am sweating in the photos...and clinging to the mantel so I wouldn't fall!

This is my official entry to the patternreview.com Red Dress Contest. If you like it please vote for it. If you don't, there are some amazing entries that you have to check out and vote for them!


Notice how well my neighbor cut my fancy new black boot out the picture? Notice just the tip of my scooter? She should be a photographer to the gimpy full time! I made a red Colette Peony out of a twill I got super cheap at Joann's. Since this isn't a difficult pattern I really focused on the insides of this dress.


This version fits a little better. I took out a horizontal dart on the back bodice and lengthened my back top darts while letting out my front bodice darts along my waistline.

Now the good part...


The entire dress has been French seamed. This is the front bodice. The sleeve and waistline as well as the side seams are French. I also finished the raw edge of the neck facing with a pretty lace.


Here is a closeup of the facing as well as the arm seam. Gosh, it looks pretty doesn't it?


As a matter of fact that is a French seamed pocket! How nice of you to notice.


And the waste line seam. I am really proud of this dress. It fits great, but more importantly I am very proud of the inside. This is the most care I have put into a garment, and I can't wait to wear it.

By the way, if you haven't made a Peony, you should. It is such an easy dress and so cute.

Monday, February 27, 2012

A second look at the Sencha

So, I may be breaking the rules when it comes to the Shirt a month, but I made a Sencha a long time ago that I kept and even got out to try on every couple of months to find out what I did wrong. I decided with my not being able to really cut our anything or sew much with my foot down, I would try to fix the disaster. This is what I came up with.


Yeah, that's my ride for the next month. It is a pain but nowhere near as bad as crutches. What I finally decided to do was make the front darts along the stomach go higher.


If you look closely I did this in red thread. It did seem to help a lot.


If I make this again, and I just may, I will make it in a size, or probably two, smaller.


I have learned a lot in the last year, so I spotted several things when I really started looking at the shirt. They are embarrassing, and you deserve to see other seamster's stupid mistakes.


I zig zagged the edges of my facings. That's OK, but I've come a long way.


My understitching, well I guess I just didn't know what that was. I stitched through the outside, seam allowances and facing. The neckline is TACKY!


My facing was too short, so I guess I said, "Oh well." I sewed it in too short and just left it raw! What is that!?!


On my sleeves the directions said to hand stitch them down invisibly. I made the stitches so loose and far apart I could actually put my thumb through them.

Am I a snob? No! I think this has been a fun look at where I came from. I wore the shirt to work with no one saying anything about how bad it looked too. I guess it is a win, even if only in my head.

OK, now I have to try to work on that darn red dress. Would you judge me if I missed the deadline?

Friday, February 17, 2012

French seams the Stacie way: Tutorial

I have been working on the French seams in my Peony, and have developed a few methods that have helped me I thought I would share. I have been doing French seams on garments on and off for awhile, but this project has really made me look at ways to help myself out.


First of all French seams are seams you sew in which the raw edges are encased within the seam allowance. Very unnecessary, but they look nice and are pretty darn strong. Above is the inside of the French seam we are about to make.


Place your fabrics wrong sides together. Yes, it goes against everything you believe in, but trust me. "Right sides together," is your chant when you are doing French seams.


Next I get out my 1/4" presser foot. That's right, it is used for more than my boring quilt posts!

Mathlete Moment: Remember 1/4 inch is also equivalent to 2/8 inch. 


When using a 1/4 inch presser foot you just follow the outside edge of the presser foot. Just stitch right down the seam.


Press the seam open.


Now fold it so it is right sides together. I usually like to press the seam again here to make sure it is lined up and not poofy.


Here is my seam allowance magnet. I use it for all garments. I get distracted and tend to start following the foot instead of the usual 5/8" seam allowance. This sticks to my machine and my fabric can follow it instead of the tiny markings that come on the machine.


I lined up my magnet to the 3/8" mark on my machine.


Here you just line up the fabric with the magnet and stitch.

Mathlete Moment: Your first seam was 2/8 inch, your second seam was 3/8 inch.


2/8 + 3/8 = 5/8


We made a 5/8 inch seam allowance!


Press your seam to the side.


Now look at what you did! Your seam is perfect from the outside and pretty on the inside! That 1/4" foot and magnet totally help you be more accurate.

As for the Peony, I'm working on it. I have foot surgery this afternoon and can't concentrate very well. I made this tutorial then promptly went and sewed my French seams right sides together. Posts may slow down a bit around here while I recover, but I'll be back!