Pages

Showing posts with label easy. Show all posts

Sunday, March 25, 2012

Scallops, Tangerine Tango, Lace!

I hit them all! Check it out...


Multiple pieces went into this shirt, but I love the end results so much!

First, I love Nanette Lepore's lace over orange theme she has going on.

http://www.nanettelepore.com/new-arrivals/pep-rally-dress.html
The above image is her Pep Rally Dress. I really like how the lace tones down the orange.

Second, I had a Groupon for Mood Fabrics burning a hole in my e-mail that I decided to spend on the lace I really liked (way too expensive otherwise) as well as some sateen for some Sallie Oh inspired Clovers.

Third, when I got the lace I knew I had to make use of the scalloped edges.

So, I went to a pattern I really like with simple lines, Simplicity 2599. I skipped the embellishments, but I really like the fit of the pattern over all.


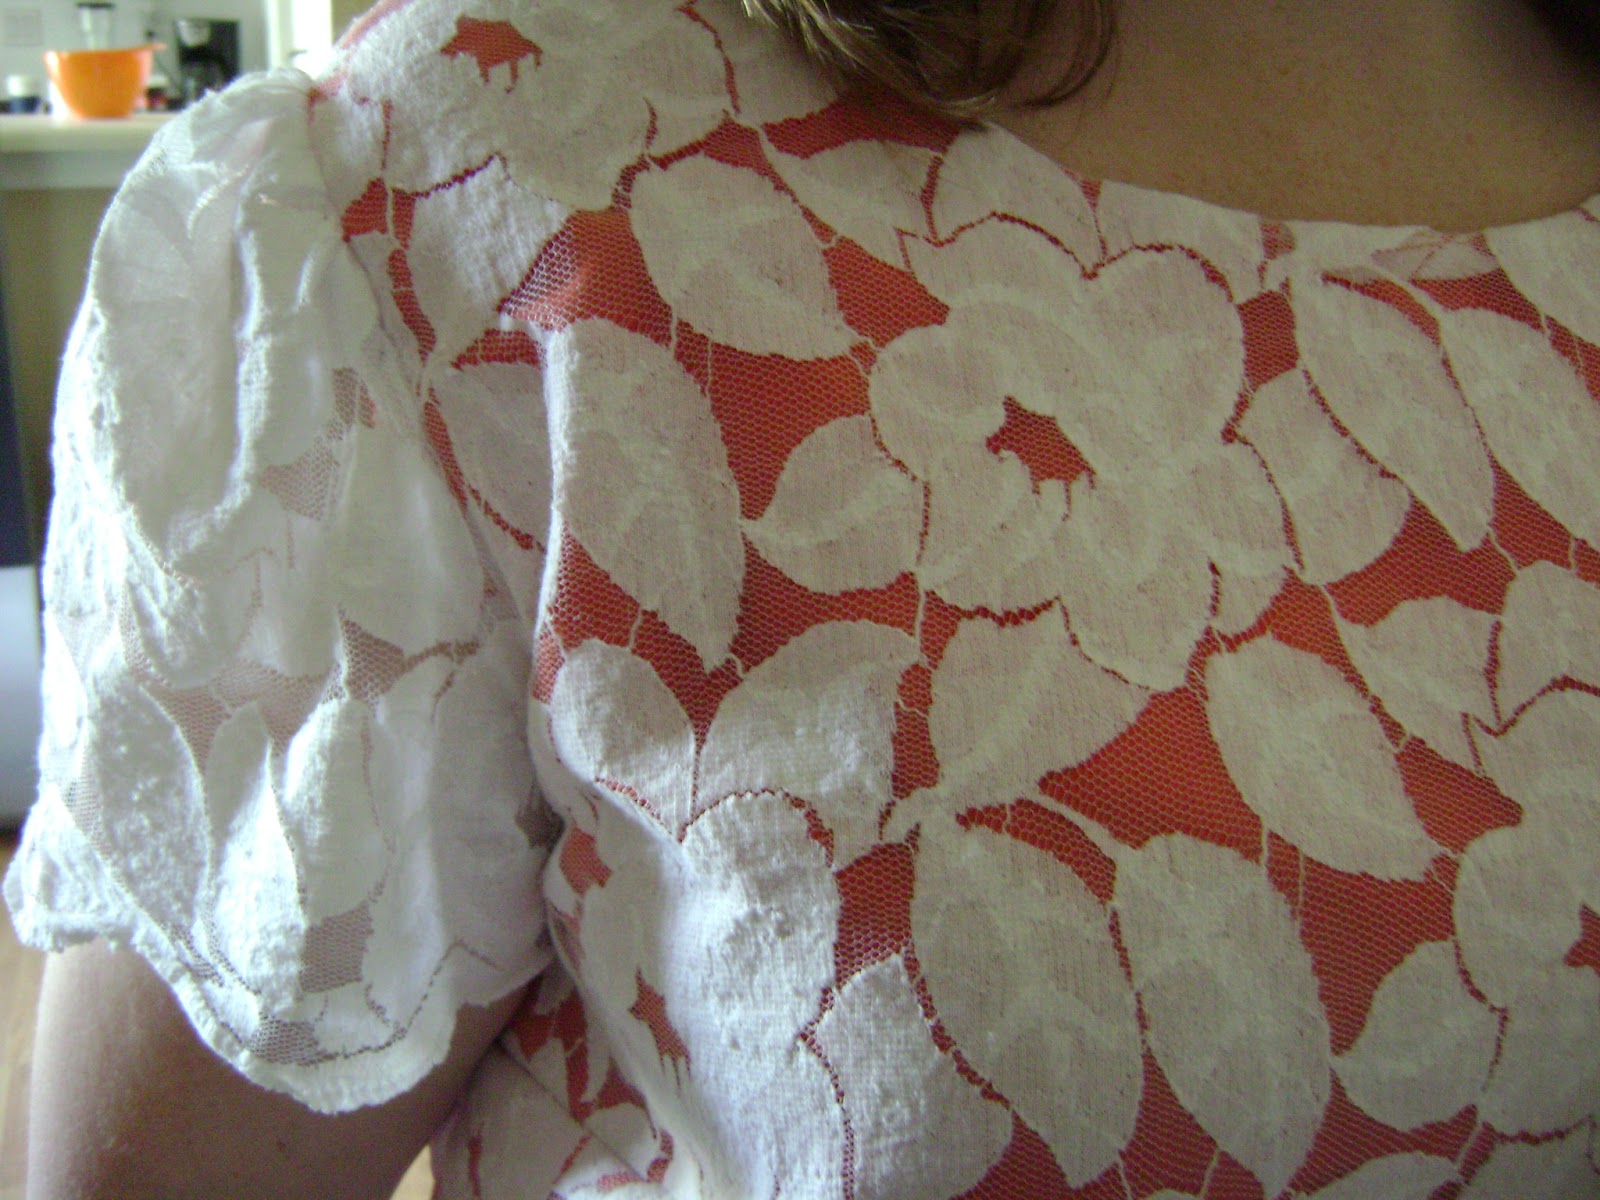
I lined the shirt with a bright orange Voile, but left the sleeves as just lace.

I also hemmed the lining a couple inches shorter than the lace to help showcase the scalloped edges.

I did the same on the front and the back.

Now if you are interested I took some construction photos. There may be a better way to make this, but this is what I came up with.

I cut out the front and back pattern pieces on my orange fabric first. I skipped the center back seam and just cut the back on the fold. It slips over my head just fine.

Then, under the judgy watchful eye of my assistant. I cut my back piece out of the fabric lining it up with the scallops showing out the bottom. I then cut the front piece out of my lace off the other side of my fabric to use the scallop edge. I lined up the front and back pieces using the waist notches to be sure the hems would line up on the shirt. Be sure to pay attention that you are using the right side of the lace on all of the pieces.

For the sleeves I just matched the center dot at the top with a center of a scallop. I repeated that on both sleeves.

I hemmed the Voile being sure to make sure it was the same hem measurement on both the front and back pieces. I  then sewed the voile and lace right sides together at the neck line only.
I under stitched the seam allowance to the lining and trimmed the excess.
I then flipped the piece right sides out.

Here is how the neckline looks on. I think it is fairly clean. Lining this way also eliminated the neck facings.

I then basted all the way around across the shoulder lines, down the arm hole and to the bottom and treated both the lace and voile as one piece of fabric and constructed it from here starting with shoulder seams, side seams then sleeves. Idid not baste the two fabrics across the bottom. It is just loose. All the hemming was done!

Be sure when sewing the shoulder seams that those inside seams line up well, otherwise they will be crooked looking.

I used this method because I did not want the lace darts to be visible. This was the dart pieces were encapsulated within the voile.

The inside is decent looking. I zig zagged the edges because I feel like I have more control with it when sewing layers. I was afraid if I serged the edges I would cut something I didn't want to. Isn't that orange, um, orange? I really like the effect the lace has on it.
I love it! And overall it only took about three hours. I can't wait to wear it some more. I think this lace overlay would make a cute simple dress too. 

Tuesday, March 13, 2012

More blocks

I have to be honest. This is Spring Break for me, which usually means me getting in 40 plus hours of sewing in and going back to work dressed in my new sweet garments. Well, it hasn't happened this year. I still have the darn boot on which is such a hindrance. I can't put any weight on my foot so every darn step is a challenge besides actually sitting and sewing. It's amazing how little projects require that. I have been working hard, but not getting much done and am frustrated!

I did get some catching up on my (free!) Craftsy Block of the Month class though. Behold: February...

Yes, they were blue and white solids, but after seeing so many cool finished ones on Craftsy I wanted to change it up. Mr. Thinks He Can took me to Joann's and I told him pick five fat quarters for me to work with. He chose blacks and grays. I have some black and gray scraps as well, and I admit the blocks are looking great! I really liked the method for the one above. each square edge is cut on the bias which made lining them up pretty convenient.

I also recreated my January blocks to match the new color scheme:


I'm liking the look. It is kind of rock and roll, and way more manly.

By the way I did not win the Red Dress Contest, but an amazing dress did. It was a fun experience to enter. Thank you for all your votes!

Saturday, March 3, 2012

Please vote for the Red Dress Contest

First things first. I got an e-mail from my awesome sewing friend Holly who knows I have been totally starved of human interaction with no walking or driving.


Bwahahahahahahahaha! I needed that! And now I have a night out with some quilting ladies that totally rock my world. Good thing, because I never did my February Blocks of the Month.

OK, now to the Red Dress Contest.

You can vote here, and you have five votes to cast. I'm partial to my own project, and my user name is Stacie Thinks. But, even if you don't vote go check out some of the amazing work that was done in this contest.

As always House of Pinheiro killed it with one yard of fabric. Is there anything she can't do?

I love the Tracy Reese pattern made by JudyMac. I would live in that dress for the summer!

And this one by Quinner is just beautiful!

I have never sewn a solid red dress, but it is so flattering and easy to wear. I see more of these in the future. Well, maybe not all red, but at least more solid dresses.


<a href="http://pinterest.com/pin/create/button/?url=http%3A%2F%2Fwww.staciethinksshecan.com%2F2012%2F02%2Fred-dress-contest-entry.html&media=http%3A%2F%2F2.bp.blogspot.com%2F-mYBcEJCMST4%2FT07KWg0LVuI%2FAAAAAAAABAs%2FFd2iFEv8YgE%2Fs1600%2Fred%2Bpeony%2B004.JPG&description=Colette%20Peony%20from%20Stacie%20for%20Red%20Dress%20Contest" class="pin-it-button" count-layout="horizontal">Pin It</a>
<script type="text/javascript" src="http://assets.pinterest.com/js/pinit.js"></script>

Wednesday, February 29, 2012

Red dress contest entry

Whew. Sewing with one leg is a challenge! It's not the actual sitting and sewing though. It's the pinning and ironing and finding where the seam ripper went that killed me. And yes, I am sweating in the photos...and clinging to the mantel so I wouldn't fall!

This is my official entry to the patternreview.com Red Dress Contest. If you like it please vote for it. If you don't, there are some amazing entries that you have to check out and vote for them!


Notice how well my neighbor cut my fancy new black boot out the picture? Notice just the tip of my scooter? She should be a photographer to the gimpy full time! I made a red Colette Peony out of a twill I got super cheap at Joann's. Since this isn't a difficult pattern I really focused on the insides of this dress.


This version fits a little better. I took out a horizontal dart on the back bodice and lengthened my back top darts while letting out my front bodice darts along my waistline.

Now the good part...


The entire dress has been French seamed. This is the front bodice. The sleeve and waistline as well as the side seams are French. I also finished the raw edge of the neck facing with a pretty lace.


Here is a closeup of the facing as well as the arm seam. Gosh, it looks pretty doesn't it?


As a matter of fact that is a French seamed pocket! How nice of you to notice.


And the waste line seam. I am really proud of this dress. It fits great, but more importantly I am very proud of the inside. This is the most care I have put into a garment, and I can't wait to wear it.

By the way, if you haven't made a Peony, you should. It is such an easy dress and so cute.

Friday, February 17, 2012

French seams the Stacie way: Tutorial

I have been working on the French seams in my Peony, and have developed a few methods that have helped me I thought I would share. I have been doing French seams on garments on and off for awhile, but this project has really made me look at ways to help myself out.


First of all French seams are seams you sew in which the raw edges are encased within the seam allowance. Very unnecessary, but they look nice and are pretty darn strong. Above is the inside of the French seam we are about to make.


Place your fabrics wrong sides together. Yes, it goes against everything you believe in, but trust me. "Right sides together," is your chant when you are doing French seams.


Next I get out my 1/4" presser foot. That's right, it is used for more than my boring quilt posts!

Mathlete Moment: Remember 1/4 inch is also equivalent to 2/8 inch. 


When using a 1/4 inch presser foot you just follow the outside edge of the presser foot. Just stitch right down the seam.


Press the seam open.


Now fold it so it is right sides together. I usually like to press the seam again here to make sure it is lined up and not poofy.


Here is my seam allowance magnet. I use it for all garments. I get distracted and tend to start following the foot instead of the usual 5/8" seam allowance. This sticks to my machine and my fabric can follow it instead of the tiny markings that come on the machine.


I lined up my magnet to the 3/8" mark on my machine.


Here you just line up the fabric with the magnet and stitch.

Mathlete Moment: Your first seam was 2/8 inch, your second seam was 3/8 inch.


2/8 + 3/8 = 5/8


We made a 5/8 inch seam allowance!


Press your seam to the side.


Now look at what you did! Your seam is perfect from the outside and pretty on the inside! That 1/4" foot and magnet totally help you be more accurate.

As for the Peony, I'm working on it. I have foot surgery this afternoon and can't concentrate very well. I made this tutorial then promptly went and sewed my French seams right sides together. Posts may slow down a bit around here while I recover, but I'll be back!

Thursday, February 9, 2012

My best quilt ever!

I know, I say it every dang time, but I totally mean it! It's my best quilt ever!


It is just so darn happy looking!


Here is how I handled my cheap flannel backing that was only 44" wide. I made a thin stripe of the flower  fabrics down the back. I really like how it turned out.


For the binding I chose to use the scraps of flower fabrics. I mimicked the pattern on the inner border. I also used the same pattern on the back. Probably no one would ever notice that but us.


Here is an up close of a flower. I wound up quilting it by stitching in the ditch, but I also did a diagonal criss cross across the flower bits. I just wanted to make sure it was all secure.


I washed the quilt once so far to help the flower edges rag out a bit. I don't know about you, but people always say washing the quilt will make it crinkly and awesome. I admit, I have never washed a quilt for fear the washer will destroy it. Next time you finish a quilt and you two are cuddling on the couch and thinking about washing and drying it, but also thinking, "But me and new quilt are in LOVE and want to watch Glee and cuddle." Get yourself together and wash the quilt. It is amazing how much softer and cuter it got. The quilt is actually in the washer right now while I try to get the flower edges to fray more.


Finally, I love it. The French Roses pattern was deceptively easy. As for my friend, wait what friend? The nice thing about it being a surprise is that now that quilt and me and in love I might just keep her. Mr. Thinks He Can thinks I should hang it on my sewing room wall or sell it on Etsy for $500. Hehe, I like the confidence in my skills, but it is far from perfect. Any other ideas for what to do with a quilt?

I also entered this quilt on Craftsy's Project Cupid. If you like it, please go 'heart' the quilt.

Thursday, February 2, 2012

French Roses quilt top completed

I am so pleased with how it turned out!


There is a weird mirror reflection on it, but it has turned out so darn cute. If you are interested in taking up quilting, this pattern is pretty foolproof. There is nothing exact about it other than cutting a few straight lines.


Here is a close up of my borders. The inner border is just my five flower fabrics in a repeating pattern. The pattern includes an ingenious way pf making them so it is quick and painless. The outer border  is just a long strip. All of my white fabric (and peony muslin) came from a really nice quality white sheet I thrifted. It has really held up well and has a nice weight to it.


It is winter in the quilt's new home, so I chose a flannel to back it. I plan on piecing the green flannel with a few scraps from the flower fabrics. I think I will bind it using the two red fabrics I have stacked on top there.


Isn't the green perfect and springy? It matched perfectly and was on sale for $2.50 a yard at Joann's. I love it! I am hoping to have it sandwiched this weekend, and maybe quilted. I plan to stitch in the ditch for quilting as the flowers will fray up when they are washed. I don't want to inhibit that by stitching over them. 

Sunday, January 29, 2012

Basic T-shirt

I joined the Shirt A Month (SAM) group per Doobee, then realized I need to make a shirt now because I have three days left this month, and they are almost totally filled. I had New Look 6838 in my stash and a cut of camouflage knit I found on clearance at Joann's, so I thought 'what the heck.'


I really like this shirt! I made the whole thing in about an hour. I followed the measurements in the pattern and made an XL. I wound up taking it in an inch on both sides and the center back as well as the sleeves. Also, those sleeves are supposed to be 3/4 length. It was a bit huge. Now, take in consideration I don't work with knits a lot even though I would like to. I used my serger for everything except the neck and sleeve hems. I didn't hem the bottom. I'm tricky like that.


Here is my center back. It is wrinkly because I am holding up my hair. I almost cut it on the fold, but I had to take it in so much everywhere I am glad I didn't.


Here is a goofy picture of my neckline I used a very thin zig zag stitch. I didn't think Mr. Thinks He Can was shooting my face, so I am looking goofy. The neck was huge as well, but when I took in the center back that helped the neckline as well.


Overall it is a comfortable shirt. I always wear long sleeve T-shirts and I am proud to have made my first one. Next time I make it, I think I will go with a medium. I think I will even wear this one to work tomorrow.

Look at me, shirt a month challenge for January is in the bag! The quilt is looking awesome too. What a great weekend!