Pages

Showing posts with label lace. Show all posts

Sunday, March 25, 2012

Scallops, Tangerine Tango, Lace!

I hit them all! Check it out...


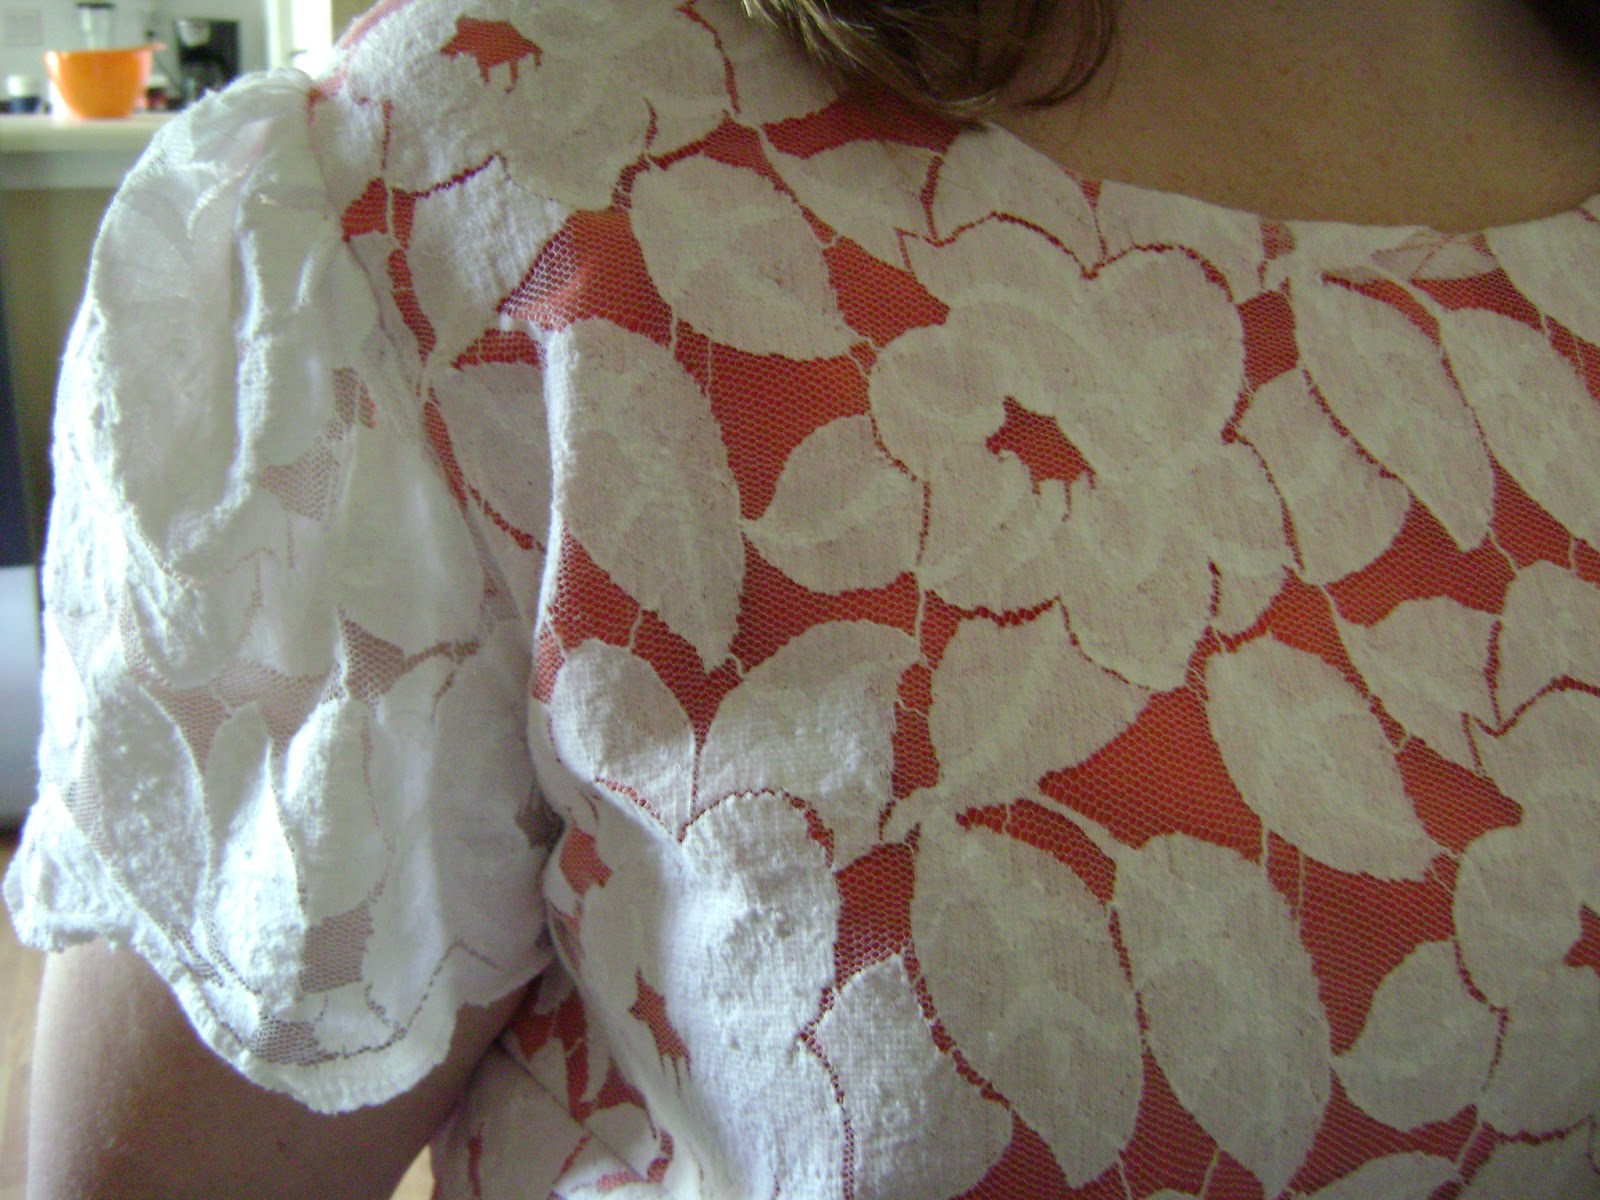
Multiple pieces went into this shirt, but I love the end results so much!

First, I love Nanette Lepore's lace over orange theme she has going on.

http://www.nanettelepore.com/new-arrivals/pep-rally-dress.html
The above image is her Pep Rally Dress. I really like how the lace tones down the orange.

Second, I had a Groupon for Mood Fabrics burning a hole in my e-mail that I decided to spend on the lace I really liked (way too expensive otherwise) as well as some sateen for some Sallie Oh inspired Clovers.

Third, when I got the lace I knew I had to make use of the scalloped edges.

So, I went to a pattern I really like with simple lines, Simplicity 2599. I skipped the embellishments, but I really like the fit of the pattern over all.


I lined the shirt with a bright orange Voile, but left the sleeves as just lace.

I also hemmed the lining a couple inches shorter than the lace to help showcase the scalloped edges.

I did the same on the front and the back.

Now if you are interested I took some construction photos. There may be a better way to make this, but this is what I came up with.

I cut out the front and back pattern pieces on my orange fabric first. I skipped the center back seam and just cut the back on the fold. It slips over my head just fine.

Then, under the judgy watchful eye of my assistant. I cut my back piece out of the fabric lining it up with the scallops showing out the bottom. I then cut the front piece out of my lace off the other side of my fabric to use the scallop edge. I lined up the front and back pieces using the waist notches to be sure the hems would line up on the shirt. Be sure to pay attention that you are using the right side of the lace on all of the pieces.

For the sleeves I just matched the center dot at the top with a center of a scallop. I repeated that on both sleeves.

I hemmed the Voile being sure to make sure it was the same hem measurement on both the front and back pieces. I  then sewed the voile and lace right sides together at the neck line only.
I under stitched the seam allowance to the lining and trimmed the excess.
I then flipped the piece right sides out.

Here is how the neckline looks on. I think it is fairly clean. Lining this way also eliminated the neck facings.

I then basted all the way around across the shoulder lines, down the arm hole and to the bottom and treated both the lace and voile as one piece of fabric and constructed it from here starting with shoulder seams, side seams then sleeves. Idid not baste the two fabrics across the bottom. It is just loose. All the hemming was done!

Be sure when sewing the shoulder seams that those inside seams line up well, otherwise they will be crooked looking.

I used this method because I did not want the lace darts to be visible. This was the dart pieces were encapsulated within the voile.

The inside is decent looking. I zig zagged the edges because I feel like I have more control with it when sewing layers. I was afraid if I serged the edges I would cut something I didn't want to. Isn't that orange, um, orange? I really like the effect the lace has on it.
I love it! And overall it only took about three hours. I can't wait to wear it some more. I think this lace overlay would make a cute simple dress too. 

Wednesday, February 29, 2012

Red dress contest entry

Whew. Sewing with one leg is a challenge! It's not the actual sitting and sewing though. It's the pinning and ironing and finding where the seam ripper went that killed me. And yes, I am sweating in the photos...and clinging to the mantel so I wouldn't fall!

This is my official entry to the patternreview.com Red Dress Contest. If you like it please vote for it. If you don't, there are some amazing entries that you have to check out and vote for them!


Notice how well my neighbor cut my fancy new black boot out the picture? Notice just the tip of my scooter? She should be a photographer to the gimpy full time! I made a red Colette Peony out of a twill I got super cheap at Joann's. Since this isn't a difficult pattern I really focused on the insides of this dress.


This version fits a little better. I took out a horizontal dart on the back bodice and lengthened my back top darts while letting out my front bodice darts along my waistline.

Now the good part...


The entire dress has been French seamed. This is the front bodice. The sleeve and waistline as well as the side seams are French. I also finished the raw edge of the neck facing with a pretty lace.


Here is a closeup of the facing as well as the arm seam. Gosh, it looks pretty doesn't it?


As a matter of fact that is a French seamed pocket! How nice of you to notice.


And the waste line seam. I am really proud of this dress. It fits great, but more importantly I am very proud of the inside. This is the most care I have put into a garment, and I can't wait to wear it.

By the way, if you haven't made a Peony, you should. It is such an easy dress and so cute.

Saturday, February 11, 2012

Pattern Organization and Fabric check

I was looking for a pattern I bought on sale. I knew I bought the pattern- where the heck? All the patterns in the file cabinet drawer were dumped on the floor to be sorted through. Not there. Wait, what's that... I stretched my arm back through the back of the drawer and felt paper. I gave a pull and unearthed an addiction.


Found it. But they were all on sale! See, I've used a lot of them... Ok I have enough to justify organizing them.

I used the drawer again, but this time used folders marked:

Dresses
Shirts
Skirts
Pants
Sportswear Collections
Knits Only
Random (seasonal, slippers, etc.)
Vintage
Bags


Believe it or not, that is better.

Having seen all the patterns, I decided to pull out my fabrics and try to match them up.


It all fits in that tub, so it isn't too bad.


This is a pretty clearance rayon that I think would make a pretty shirt dress (but kind of suspect that it will look kind of 90s and must be sported with combat boots). There are three yards of it, so if you have any ideas for it, please let me know.


A planned Texas themed quilt. I intend to do it later in the Spring. We are a proud people here in Texas.


Baby shower gifts.

Dear Stacie,


Why would you give a dead cow and chili pepper themed gift to a baby?


Concerned Reader

Dear Concerned Reader,

This is a joke fabric. The couple doesn't know the sex of the baby, but I know dad has a love for Southwest inspired decor which drives his wife crazy. I think this will be a lesson to everyone to tell me the sex of your baby or you will get scary baby shower gifts. Yes, I will probably make it a more appropriately chosen present after it is born. Until then I am sending a powerful message.

Stacie


Scraps big enough to make tote bags from.


Fusible, interfacing and muslin, oh my!


Skirts. Has to be right? They are my summer uniform, and I love bright colored skirts.


Seasonals: Christmas and Halloween to be exact. Check ya next year!


I have about three yards of this lace which is so pretty and drapes nicely- except for the color. I think I may dye it a prettier blue to make a summer dress out of.


I may make a Violet out of this material. I have held off because it is so slippery and cheap feeling. I may want to make one out of a cotton first to see how it goes. Maybe it would make another good attempt at a Taffy...


This is a weird tube of scratchy knit I acquired randomly. I may try to make another cardigan like my Polka Dot one. I don't know what else I would do with it...


This is an awesome print given to me by Holly for Christmas. I used some of it to make a tote bag, and I'm hoping to either make a sorbetto or a skirt out of the rest of it. Hopefully there is enough for the sorbetto because I just don't wear too much white on bottom. Super cute!

That's it! I am trying to inventory what I have with what I need because I have surgery on my foot scheduled for Friday, and I won't be able to walk for six weeks! I will have a knee scooter, but good luck getting one of those through Joann's. I have been practicing left footed sewing, so hopefully I can get a few garments done.


Thursday, December 22, 2011

Yummy charcoal Clovers

Greetings from Santa's Sweatshop! Whew! I feel like all I have done for a few days is sew my fingers off to get everything done. It has all turned out well though.

I finally had an opportunity to take a picture of my second pair of Clover pants in the day light. I made these a few days ago and just got too busy to take pictures.


Never mind my weird face. I made this from a charcoal sateen I ordered from Mood. It seems a bit thicker and better quality than the fabric from Joann's I used last time.


My red pair tends to stretch out during the course of the day, so I made my seam allowance a quarter of an inch thicker than last time. It make for a closer fit, so hopefully over the day they won't get too baggy.


Haha! Made you look again. And again, it is a great fit on my rear. Yay!


My assistant is such a picture hog. I had to get a shot of her on the blog or have hell to pay.


You can see a little bit of a bump at the bottom of my invisible zipper. I still haven't got that down, but this pair went smoother than the last pair. I left the length alone and finished the inside with white lace tape this time. I love the lacy insides.

Saturday, December 10, 2011

Crimson and Clover

I have been sitting on these Clovers for a week. Literally, I've been living in them. I wore them to work. I wore them to class, and I am happy to report they are fantastic. I do have to admit, I bought this red sateen, Viking Red sateen technically, from Joann's. It was cheap, and the last time I made pants I wound up doing a billion alterations and still don't care for them much. I figured this would be a wearable muslin if anything.


Sorry, they are a bit wrinkly, but like I said I refuse to take them off. They are a bit stretched out too from being worn and not washed yet. And they still look like a pretty good fit!


Here is the amazing part...my butt. Made you look! No really, my awesome teacher Jenny had to teach me how to make an almond shaped butt dart from under my butt cheeks on my last pair of pants. She had no idea anyone could be so bottomless. These pants actually fit my rear quite nicely if I do say so myself. 


Check that out, there is a lump back there where most women keep there butts! I was hoping this would happen. A lot of reviews I read of these pants mentioned there were a lot of sway back adjustments or alterations so the pants would fit in the rear. When I read that I thought to myself, "Ah ha! All those women with the hour glass shape that look cute in everything have nothing on my apple shaped wonder body!" I bought the Clover pattern and just as I hoped, they did indeed fit.

I did make one alteration. Based on the pattern back I cut a 16 in the waist and graded to a 14 in the hips. I also left them a bit longer than the pattern directions stated. I am 5'5, and if you are any taller than me and want regular length pants I recommend you add a couple of inches to the length.


Lets talk guts. I finished the inside facing as well as the hem with black double fold lace that I had in my stash. At this point I had tried the pants on and knew they were keepers, so I wanted to kick it up a notch. I also added my new customized label I got from Jennifer's Jewels on Etsy. It matches my blog!


Here is the hem of my pants. I covered the raw edge in lace and folded it up about half an inch. I was really short on length for a proper hem, but it worked out.


Here is my top stitching around the waist. Isn't the color Christmasy?


Invisible zipper...meh. It could be better, but I had a zipper in there originally that the pull came off of. I wound up having to deconstruct and reconstruct to get a new zipper in. You can't tell when I wear them.


One last look. I love them. I already have some charcoal colored sateen in my room waiting to become a pair of Clovers. Maybe today!

Thursday, November 24, 2011

Happy Thanksgiving Friends


Happy Thanksgiving to everyone, and to everyone that doesn't celebrate Thanksgiving...Happy Thursday!


I got to thinking last week. I have made everyone I know an apron, and I need one with Thanksgiving looming and Christmas right around the corner. I went to High Fashion Fabrics with my awesome teacher and friend Jenny this week and we got to talking about colors. I have been sitting on this fabric out of the Inncoent Crush collection from Anna Maria Horner for a long time, just waiting to use it on something. I, being of fair to borderline translucent skin cannot wear yellow. While shopping Jenny shared I can wear whatever color I like, I just needed to get the right shade. I had one yard of the mustard color with flowers and one yard of the coordinating purple. What to do? Of course I pulled out my One Yard Wonders book for an apron pattern.
I stumbled upon this book when admiring the sew along Pink Chalk Studio is doing. People are making amazing projects.


<-------- Their final version of the apron.

--------->
The fantastic layout and easy to read directions.


I made the cottage apron and made a few modifications. I used self made bias tape and instead of ribbon I made ties from my contrasting fabric to match the bias tape. Because I did not have a whole lot of fabric left after cutting bias tape I changed the back of the apron to just have a halter style neck.


See, no crossover straps back there.


You can see here I fussy cut my pockets so they would match the pattern on my fabric, and so the whole apron would be centered with the flowers in the middle. You can see the bias tape along the tops of the pockets and finishing the raw edges around the apron.


Also, the original pattern used an eyelet finish to edge the top and stick up above the neck line.  Being difficult like I am, I wanted to participate in Debi's So Grateful challenge. This called on all her readers to use something, fabric, pattern notion, etc. in a project that had been given to you by someone else.


I chose this pretty lace trim that I got from Project Angel Kisses. My sewing machine did not like it. It is pretty thick. I basted it along the neckline before I added the bias tape around the top. I managed to catch all of it! I think this is my favorite detail on the apron.

Now, being an American here is my tribute to some of the things I am grateful for:

  • Mr. Thinks He Can and his unending patience and support
  • My beautiful four-legged assistant for all the kisses, tail wagging and cuddles. 
  • My family near and far. We have had a rough patch lately and I am amazed at how we all pulled together and supported each other.
  • My blog and readers, I love that people are interested in this hobby I am learning.
  • My friends and colleagues that make all my days better... I can't call everyone out by name because it would just get too long!
  • My job and education.
  • Every day.
Thanks for reading everyone!