Pages

Saturday, July 16, 2011

The Anthro-Inspired Dress (So Easy, Seriously!)

Hello readers! In Stacie's absence (vacation, where she is showing off her pink beach cover up and making everyone jealous) she asked me to contribute to the blog and write about the Anthro-Inspired dress we made. First, Stacie gets credit for finding this amazing tutorial via Sarah on the Sew Weekly during embellishment week. It was so easy to follow along with and for any budding sewers out there, I would recommend this project right up there with the Simplicity skirt we made.

Also, I have to cop to buying ALL the elastic in Jo-Anns, on accident of course. Stacie and I shopped the 4th of July sale and I accidently bought the whole roll of elastic we needed for this project. My bad. I was so excited to make this dress that I went home and made 2 since the first one was so easy. Stacie followed suit and before you know it, we're obsessing over this project like we did on the Simplicity skirt a la making 4 and 5 at a time!

Here is a link to the tutorial.


The first one took me about 2 hours because I did the lace detail. The second one, without the lace detail took me about an hour and a half. I also had some machine issues when I was sewing on the elastic. I had to do some creative sewing to cover up my mistakes on the first dress, you'll notice the elastic band is smaller than the second dress, despite using elastic from the same roll. On the second dress, my machine was throwing up thread all over my stitches so I went back over it with a "decorative" stitch (zig zag was the only thing that could cover up what my machine did) which ended up working out.


Here is Stacie's creation, made with a gray seersucker material. Overall, a very cute dress that is casual but still looks good. I will definitely be making another one! I already have plans for a maxi-version with this lovely silk fabric I picked up...

Wednesday, July 13, 2011

Vogue tames the beast

I recently finished The Beast, my friend Holly and I slaved over this dress for probably 6 weeks and finished to mixed results. The dress had a great fit and turned out really cute with a few tweaks, but there were a couple of things that didn't translate into our dresses too well.

This is a line drawing of The Beast, or for those who have yet to try it, Vogue 1241.

Notice the front collar, It is a bit weird on. It stands a bit weird and requires some precision hand sewing to keep your chest from being totally exposed. Just below that is the dreaded loin cloth piece. That thing was a mofo to attach, and probably took two whole sewing sessions. On the back there are cute little gathers, that once put onto a human form are placed right were we just want to look like we have more...you know, the muffin top region. So what would we change? The collar, the loin cloth and the muffin top gather sin the back.

This is from the just released Vogue patterns, Pattern 8742 to be exact. Are you thinking what I'm thinking? After I e-mailed this to Holly I got a reply that started with , "OMG, I'm pissed!" Not only does this version lose the weird neck, loin cloth and muffin top gathers, but it is carried under the Very Easy Vogue line. Nothing about the beast was "Very Easy".

Bottom line, we were pissed, but we like the sleeves. Yeah, we're suckers. Expect to see a version this fall!

Tuesday, July 12, 2011

Free Beach cover-up

I'm so excited about this one. This is my beach cover up to take on vacation. This is a free download from Hot Patterns available on Fabric.com.

I used a strange fabric from Joann's. It was on sale. It is pink, and has really sheer flower spots and some sparkle embroidery. LOL, I obviously know my fabrics, right? Anyway, this was an easy pattern. I did put elastic in the waist instead of a ribbon like it calls for. I don't know if I will keep it that way or not. I also skipped the button on top just because. I don't want a lot of stuff to mess with on the beach.


The way I stand kind of makes it look like maternity ware. You can also see my elastic showing a bit. To ribbon, or not to ribbon? This is a good length.
From the side it is on OK little dress. I love the color. The dark spots are my swim suit showing through the sheer flowers woven into the fabric.
Hehe, from behind it sort of looks like a kimono.

Overall, very cute, comfortable and free pattern. I wish I had used a bit softer fabric, so it would hang better. I like it though. I didn't do any fancy finishings because I want it to dry fast. Also, in the future I may just use a casing around the whole cover up and just use elastic. It might me nice to add pockets as well. You just have to have a place for Chap-stick on the beach.

Also, this was my first time using a downloaded pattern. This is what to expect:


I had to print this twice. The first time I was trying to make the lines meet, which doesn't work out. Just make the edges of the pages meet up. Here is a close up of what that may make the pattern look like:

It does come with a handy map to show you how to lay out the pages There is some method to the madness though once you dive into it.
This is a close up of the pattern map that displays the lay out.

Sunday, July 10, 2011

Christmas in July

I just took the best class ever. I have mentioned before that I learned most of my mad sewing skills from Jenny Gabriel. She still offers fun classes since Sew Crafty closed, they are just a bit further to go. Well, check out my awesome stockings!

How cute are these? They hardly take anytime at all. What an added bonus that Jenny brought her embroidery machine and personalized them for us! I actually got all these done within the class time, and that is with me wondering around chattering with everyone and begging Jenny for a serger class. (Please Jenny! Please!)

Here is a close up of my stocking. I so love it!

 Now for the guts. This stocking is basically two lining layers, I used muslin, and two outer layers. I believe I used a quilting cotton from Hancock's.

 For the toe, heel and cuff I used a thin quilters cotton. I wish I had used a bit thicker fabric, but I thought I would just practice making one in class. I didn't expect to leave with such an amazing product.
The toe and heel are just on the front, so the back of the stocking is left plain. I like both sides.
The cuff attaches to the top and is simply folded down. That's it! How easy is that? I think everyone will be getting stockings for Christmas this year. This pattern would be so easy to embellish and personalize as well.


Jenny seemed a bit amazed that the pup would need a personalized stocking, but just look at that happy customer! Too bad the house is on the market or I would set up the tree.

I can't wait for Christmas!

UPDATE: My friend Angie that took the class as well took some pictures of her stockings to share as well. I love her fabric!

Friday, July 8, 2011

Skirt fever!

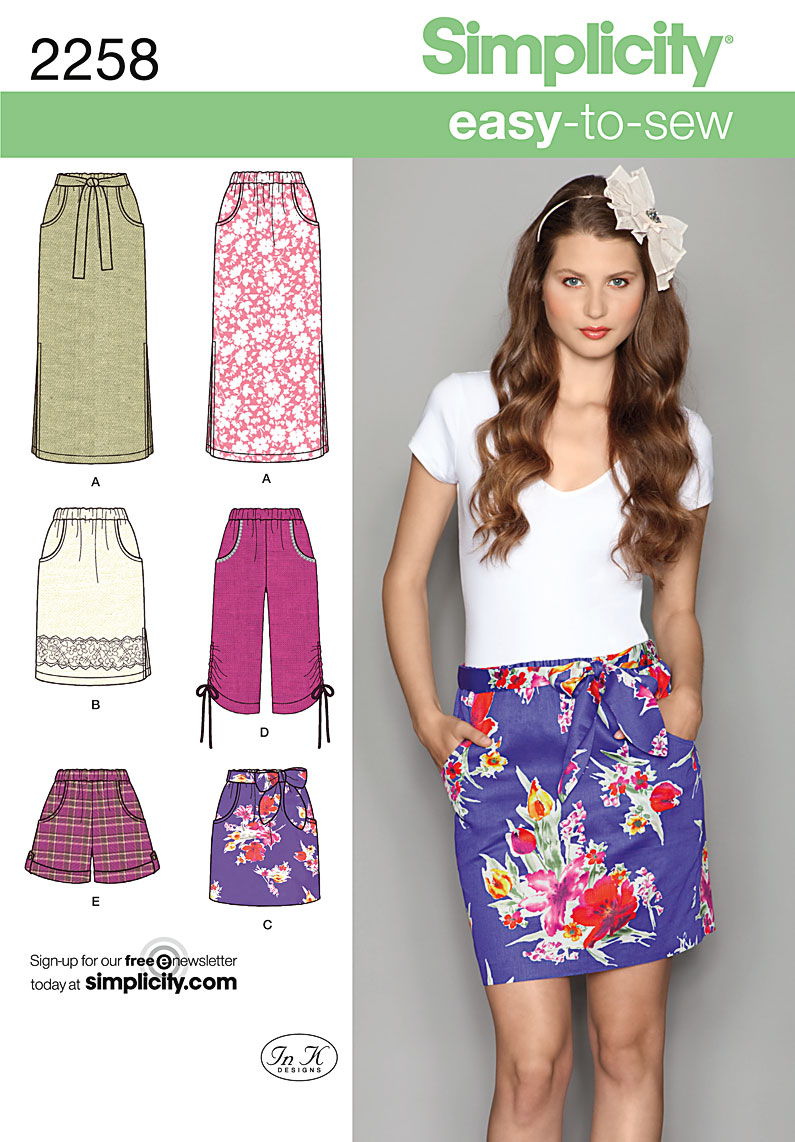
I have already worn my skirt three times. Yes in two weeks. Remember, Holly and I had made Simplicity 2258 the weekend before last? Well, I made it again (and again).

I made one for my bestie Jen for her birthday. That was my first time making a garment/gift, so I wanted it to be really special. She is a bit more modest than I am, so I made her the longer version but kept the ties. She also loves Hawaiian things - like her husband! So I paid tribute to Hawaii with the material which is a shirting I found at Joann's.


This is the outside front of the skirt. I love how saturated the colors are. I think it would be great for a luau!
Since I was making this for someone else, I wanted it to be really nicely done. I used bias tape to finish the raw edge around the waist and along the bottoms of the pockets.
I also used lace hem tape, courtesy of Grandma Betty circa 1976. I know that is not how it is supposed to be used exactly, but I thought it added a nice touch.
Here is the front with the waistband untied . I think I like this view just as much.

And this solves the mystery of why everything I have is covered in dog hair. Of course she takes the best light and takes a nap in it then refuses to move. We'll just call any strays a bonus gift from the pooch.

But wait! There is more!

I just got busy this morning making yet another one. I know, the next project I have to show you is different I promise.
This is an eyelet version I made for myself without waist ties. I did line it though because the eyelet was way more shear than I anticipated. I thought my how to could help some people on this one. I put my pink skirt together per the direction until I got to the waistband.

At that point I took the lining which I made of muslin and sewed the sides and hem together. Remember you don't need to cut pockets out of this part. This is the front, and the sides just go straight up. I simply extended my cutting lines on the waist and side until they met to duplicate a front piece without pockets.
I zig zagged the edges on both the skirt and lining because neither one will be visible. No French seams here!
I then basted the two pink skirt and lining together at the waist. This kept everything together while I applied the waist band as usual.

When completes this is now my finished skirt looked inside. I made the lining shorter on purpose because it is too hot to wear extra layers here in Houston. I just didn't want anyone checking out my knickers. There are no raw edges because I put it together so the raw edges face each other.


And again, the outside. You can't even tell there is an extra layer there. Maybe when Mr. Thinks He Can gets home I will add an action shot in the skirt.

Thursday, June 30, 2011

Ode to "Grandma" Betty

No, I don't have a grandma named Betty. I don't have any grandmas anymore, but if I did I would want them to be just like Betty. I found an estate sale on Craigslist with sewing notions listed, so of course I called Holly and we headed on over there. What we discovered was that Betty has been sewing and collecting all kinds of great stuff since the 60s. Not her 60s, as in the 1960s.

Betty left us so many good things. It was hard to see some of the stuff that was being sold including several hand stitched quilts. They were marked too high for me to save, but I hope they find a good home if they can't stay with her family. Check out what our new Grandma Betty let us have.


This is a cool wheel that helps you choose the proper weight interfacing for your fabric. I don't have that down just yet, so this is an awesome find. My only fear is going to Joann's and asking for a weight they have not used since 1974. Spooky Hotel California stuff there.


Hem tapes, Stitch Witchery, Twill Tape...general notions everyone needs.


I love the belt making kits! The white one is pretty thick and cute looking. The black one deserves a closer look...
Turns out in 1968 Betty was a crazy go-go dancer making her own 'Leather-like Vinyl' belt. I love it!

Check out my tracing paper. I thought it just came in blue or yellow in long skinny strips that have to be repositioned all the time. It turns out it comes in sheets in every color of the rainbow! Notice how inflation works right to left: .25 to .29 to .70.

A lot of vintage zippers, mostly metal.


A giant sack of buttons that span a huge chunk of history. I think Betty left those no-sew Gripper Fasteners just for me. She saw what happened on my Walkaway dress.


Check out what else was in the button sack, a wrist pin cushion with hand sewing needles. I had just misplaced my last one!


Now if you don't know what this is, neither do I. I just know what it does. The little jar there is filled with chalk powder, and the pump at the top blows it out. You set the jar height to the height you want your hem and turn in a circle as you pump a chalk line along the dress. I don't even know if you can get these anymore!

The total haul was $13. I have decided Batty is my patron saint of sewing. She left me this amazing collection of treasures I promise to put to good use. I think she would be happy two new seamstresses appreciated her years of collecting and sewing. Thanks Betty!

This one is for you...and girl, I saw your liquor cabinet. We were such kindred spirits!

Tuesday, June 28, 2011

Super fun skirt party!

After the beast on Sunday Holly and I went for an easy win. We wanted something quick and fun and we totally rocked Simplicity 2258. We both made version C or the one the girl is wearing. I made mine a bit longer because the picture the skirt was pretty mini. I would up cutting off my excess and it came just over my knees. What does that mean really? I am 5 foot 5, so pattern envelope girl is about 6 foot 11.
Photo

It was a totally awesome win!!!! This one is mine...

Here is Holly's...

It was funny Holly liked my material, but hers is super cute. I love both of them. After this skirt we were totally inspired. We went to Joann's to look for more skirt fabric. I think I will make a million of these.

So the skirt is very easy. The waistband is elastic, but once on it isn't noticeable. We had already cut them out, but actual sewing time was about an hour and a half.
First of all it has pockets! Hooray!

The pockets were just one piece each the folded back on itself. Super easy way to make pockets!

Here are a couple of shots of the waist tie. It is hard to see with my pattern, but it makes a great bow. As you can see on the left, the ties are shaped kind of liked paddles and attached to the side seams at the waist. Holly pointed out that piece could be used on anything. Good call!

Within a couple hours of getting back home, Holly sent me this picture:
She made another one out of seersucker she had made a dress out of that she wasn't wearing!


This was such a fun and easy pattern. As you can see every kind of fabric looks cute, I believe we both used quilting cotton for our top ones. Make one now, or two, or six! I have elastic waist skirt fever!